一、概述
本文手写两个线程同步机制应用的实例,分别是负载均衡和单例模式,这样在了解线程的同时也能了解负载均衡和单例模式,一举多得!😁
其中负载均衡是用java代码模拟一下,重点是讲解volatile关键字的应用场景,而单例模式是使用java锁机制讲解如何写一个线程安全的单例模式。
二、可见性(Visibility)
多线程环境下,一个线程对某个共享变量更新之后,后续访问该变量的线程可能无法立刻读取到这个更新结果,甚至可能会永远读取不到这个更新的结果。
两个原因可能导致可见性问题
a.JIT编译器对代码的优化
例如:
1 | toCancel = false; |
编译器可能认为toCancel的状态一直没有改变,为了提高效率对代码进行优化
1 | public void doExcute(){ |
而这样当其他线程对toCancel状态进行修改时,代码将不能看到toCancel的修改进入死循环。
b.计算机储存系统带来的影响
程序中的变量可能被分配到CPU的寄存器中进行储存。每个处理器都有寄存器,一个处理器无法读取到另一个寄存器的内容。因此如果两个线程共享的变量被分配到寄存器处理就会出现问题
另外即使共享变量在主内存中储存,也不能保证可见性,因为处理器是通过处理器缓存(包括寄存器、高速缓存、写缓存器、无效化队列)与主内存交流的,如果一个线程数据处理完放入处理器缓存还没被写入到主内存,另一个线程仍无法读取到相应数据。
虽然处理器之间不能直接读取高速缓存内容但可以通过缓存一致性协议(Cache Coherence Protocol)获取其他处理器高速缓存中的数据。所以我们要使处理器对共享变量的修改进入高速缓存或主内存就能使其在线程中可见,这个过程叫做刷新处理器缓存。
解决方案:
1. volatile能保证变量可见性和读、写操作的原子性,但不能保证多个共享变量操作的原子性
2. 加锁机制既能保证原子性又能保证可见性,但开销较大。
三、简单实现负载均衡
要求:
支持多种负载均衡算法,例如随机轮询算法和加权随机轮询等算法
- 支持在系统运行中调整算法
- 不能将请求发送给离线节点
- 节点能动态调节,离线节点被删除后,重新启动可再次被添加回来。
实现:
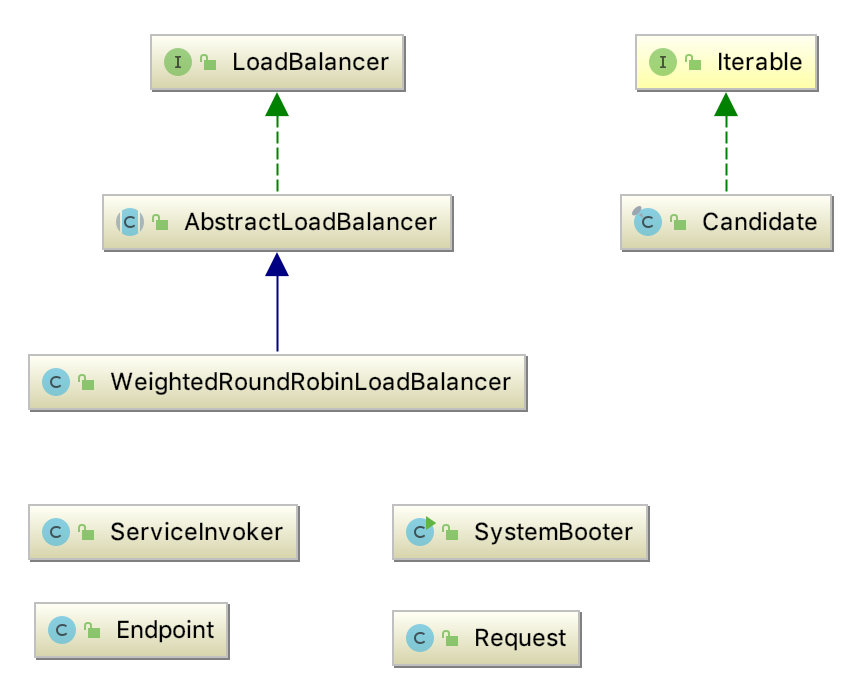
LoadBalancer:负载均衡接口
ServiceInvoker:服务执行者,调用负载均衡方法,进行请求分发
Endpoint:服务器节点实体
Request:请求实体
Candidate:节点列表和总权重
1.本类主要用于选择接点分发请求,其中LoadBalancer为了能够在系统运行过程中动态切换,并且使切换后的状态能被其他线程看到所以这里使用volatile关键字修饰。
1 | public class ServiceInvoker { |
2.Request,Endpoint
1 | // 本类并不影响理解,仅是对请求的一个封装 |
本类是节点类
1 | public class Endpoint { |
3.Candidate
1 | public final class Candidate implements Iterable<Endpoint> { |
4.LoadBalancer三连
负载均衡接口,可更新
1 | public interface LoadBalancer { |
负载均衡的抽象类
1 | public abstract class AbstractLoadBalancer implements LoadBalancer { |
真正的负载均衡实现类,加权随机轮询算法
1 | public class WeightedRoundRobinLoadBalancer extends AbstractLoadBalancer { |
启动类
1 | public class SystemBooter { |
以上就完成了一个简单的负载均衡机制,难度不打,重点是volatile关键字的使用。
1.将volatile变量作为状态变量,多个线程修改状态时保证状态的可见性。例如Endpoint需要对状态修改,但要确保心跳线程也能看见状态,于是使用volatile可见性
2.多线程共享一组可变状态变量,需要进行同步更改,简单的替代锁。如Endpoint中的host、port、weight需要同步进行更新,那么我们直接将这些都封装到一个Endpoint中确保原字性。
3.实现简单读写锁。
四、实现线程安全的单例模式
单例模式是一种常见的设计模式,但是在多线程下实现单例模式却有很多学问值得我们学习。
这个是饿汉式单例模式,没有线程会在类加载时初始化,没有线程安全问题。
1 | public class EagerSingleton { |
但这个单例一旦被加载就会被创建,我们希望在使用类的实例时再加载类,所以有了懒汉式单例模式。
1 | public class LazySingleton { |
单线程下这个单例模式是没问题的~,但是多线程就出问题了,两个线程同时进入getInstance()方法中的if,结果就会创建两个对象,出现了竞态条件~
不多BB,上锁!
1 | public class LazySingleton { |
那问题又来了,每次来获得这个实例都要排队判断。。。这谁受的了啊,于是有了这个比较成熟的双重加锁的单例模式。
1 | public class LazySingleton { |
这次好几个线程进来先判断有没有初始化这时是不加锁的所以很快,如果没初始化加锁排队,只有第一次获取才有个加锁排队的操作,以后获取实例将不进入加锁的代码(临界区)。
这里需要注意这个volatile~通常来说不加volatile不是也可以拿到新的对象吗?确实是这样的,但这个新对象是不是实例就不一定了。
flag那个位置会分解成以下几个独立操作,对这不是一步完成的!!!
objRef = allocate(LazySingleton.class),分配对象所需空间invokeConstructor初始化objRef引用的对象instance=objRef将对象引用写入共享变量
通常需要走完三步,instance才被正确赋值,但是编译器可能就会为了效率重排序由原来的1->2->3重排序成1->3->2。新的线程在走完3时进来直带走一个为初始化好还不是空的东西,这就有问题了,而volatile能阻止编器对该变量赋值的重排序,避免1->3->2的问题出现。
volatile虽然是个轻量级锁,但效率还是不入未加锁的!看看如何用静态内部实现单例模式
1 | public class Singleton { |
类的静态变量被初次访问时会触发Java虚拟机对该类进行初始化,该类的静态变量值会边成初始值而不是默认值(也就是不存在那个不安全的重排序的情况),内部类只有被调用时才会初始化,而且只会创建一次。
当然了,Effect Java中为我提供了单例模式的最佳实践,使用枚举来完成。
1 | public enum Singleton { |
使用枚举来实现单实例控制会更加简洁,而且无偿地提供了序列化机制,并由JVM从根本上提供保障,绝对防止多次实例化,是更简洁、高效、安全的实现单例的方式。
调用时使用Singleton.INSTANCE.singletonOperation()即可。
五、总结
本文主要介绍了负载均衡的简单原理和线程安全单例模式的实现,重要是volatile关键字的使用。
参考资料: